 After spending nearly 3 hours scouring the Web trying to find a way to configure my JY-MCU HC-06 Bluetooth module. There are a lot of great tutorials out there. Many of them refer to setting the key pin HIGH, or a combination of LOW then HIGH while powering on the module. However, none of these approaches worked for the unit I have. Read on to see how it can be done. Oddly, I found the answer in the DX discussion forums related to this module. Here’s the thread. Read on for how I managed to get it working.
The fluff & Warning:
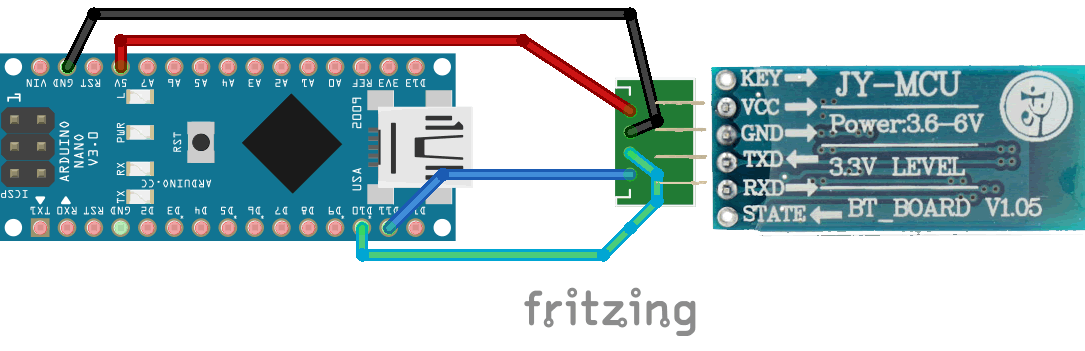
Before we start, I’ll throw this warning out there… Nearly all samples I’ve found, suggest that the connection (Arduino TX to BT RX) must be 3v3 as I’ve shown here. Although I now use this approach with BT Bot Control, it did not work for me when trying to set AT Commands. As such, I decided to gamble on connecting the pin directly to D10 (5V when high) and it worked. Also note that I’ve run this particular module for months with no 3v3 level shifting, and it has worked without issue. If you “try and fry” your module and let out the black smoke, you’ve been warned.
Update:
Based on some of the user comments, it might be wise to try the following:
- Use 3v3 level shifting to provide the correct voltage to the BT module.
- Pull the KEY PIN up as one user suggested to get AT/comand function.
Wiring:
| Arduino to BT Module
GND <> GND 5V to VCC (5V) D10 to TXD D11 to RXD |
 |
The Sketch:
The void Setup() section carries a number of sample AT commands. Un-comment the ones you need. You can also find an AT Command reference here (but note it’s for the HC-05, but most should work). Note: If you change the baud, be sure to set the new baud for mySerial in the sketch for communicating to the unit. The Serial baud should remain the same as it is used to display the responses in the Serial window.
Here’s a excerpt from the sketch:
delay(1000);
mySerial.print(“AT”);
delay(1000);
mySerial.print(“AT+VERSION”);
delay(1000);
//mySerial.print(“AT+PIN1234″); // Set pin to 1234
//delay(1000);
mySerial.print(“AT+NAMEJY-MCU-HC06″); // Set the name to JY-MCU-HC06
delay(1000);
mySerial.print(“AT+BAUD8″); // Set baudrate to 115200
//mySerial.print(“AT+BAUD4″); // Set baudrate to 9600
delay(1000);
Demo Sketch: JY-MCU HC-06 Command Mode – Arduino Sketch
Reference Info More reference (specific to the HC-05)