Wifi Bot Control
 is an Android app that allows you to remotely control a robot (or other device) via WiFi. You can also (optional) view a video stream from an IP camera mounted to the robot. WiFi Bot Control also provides up to 8 additional customizable command buttons that allow you to perform additional tasks on your robot / device. You could use these commands to initiate other activities such as enabling/disabling sensors, moving other servos / arms / picking something up, turning a LED on/off etc. With the provided sample sketch, you can customize the robot to do what you want. WiFi Bot Control can be downloaded on Google Play and is compatible with most versions of Android and most device sizes from phones to tablets.
Features
|
What You Need
WiFi Bot Control is an Android app that allows you to control a device, presumably a robot. For the sake of this write-up, it’s an Arduino robot using an Adafruit CC3000 WiFi module and a Digistum Motor Shield. However, you should be able to use most other WiFi shields and motor drivers. WiFi Bot Control is pretty much useless on it’s own, but if you’ve read this far, you probably understand that this is a purpose-specific app. Essentially, the system consists of the controlling device (your Android phone + WiFi Bot Control), an intermediate data interpreter/server (a webserver – or your local computer) and a robot of course. Details on the different pieces are documented below. This should provide you with sufficient info should you want to build one yourself. Details on where to source the components are also below.
** If you are looking to use Bluetooth to control your robot, also check out BT Bot Control.
How to Use It
WiFi Bot Control - Joystick Modes:
Default Joystick Mode:
When you move the joystick, x and y coordinates are packaged into a configurable URL string and transmitted. The following is a sample URL where the x value is 22 and y value is 44. Note the URLmode value is 1. This information is parsed into a json file and then read from the Arduino robot / device.
http://www.yourserver.com/cc3000sample/updatestatenew.php?URLmode=1&URLxval=22&URLyval=44&URLudlr=&URLcmdVal=
Simple Joystick Mode:
In Simple mode, the joystick has 4 arrows representing Forward (U), Reverse (D), Left (L) and Right (R). When you tap the arrows, the respective character is packaged into the URLudlr value and the URL string is transmitted. Tapping the center or releasing a button sends an S value (stop). Tapping the Up arrow would look like this:
http://www.yourserver.com/cc3000sample/updatestatenew.php?URLmode=2&URLxval=&URLyval=&URLudlr=U&URLcmdVal=
Command Mode:
You can add custom features to your robot / device with additional commands and customize the sample sketch provided. When a Command button is clicked, a value (1-8) is passed to the URLcmdVal variable. (i.e. Command Button #4 sends URLcmd=4) Also note the URLMode value passed is 3. Below is a sample URL string:
http://www.yourserver.com/cc3000sample/updatestatenew.php?URLmode=3&URLxval=&URLyval=&URLudlr=&URLcmdVal=4
WiFi Bot Control – Settings Screen:
- You can set the WiFi send delay in the settings. The default of 200 ms is sufficient.
- Enter the URL that points to the server and location of the php file that updates the state of the json file (updatestatenew.json) Here’s a sample of the URL with the part you enter in orange:
- http://www.yourserver.com/cc3000sample/updatestatenew.php?URLmode=3&URLxval=&URLyval=&URLudlr=&URLcmdVal=4 (enter the orange part in WiFi Bot Control and the rest of it is created by WiFi Bot Control)
- Debug: Show URL Data String Being Sent allows you to see the content being parsed into the URL on the main screen (at the top).
- The other features are pretty self-explanatory.
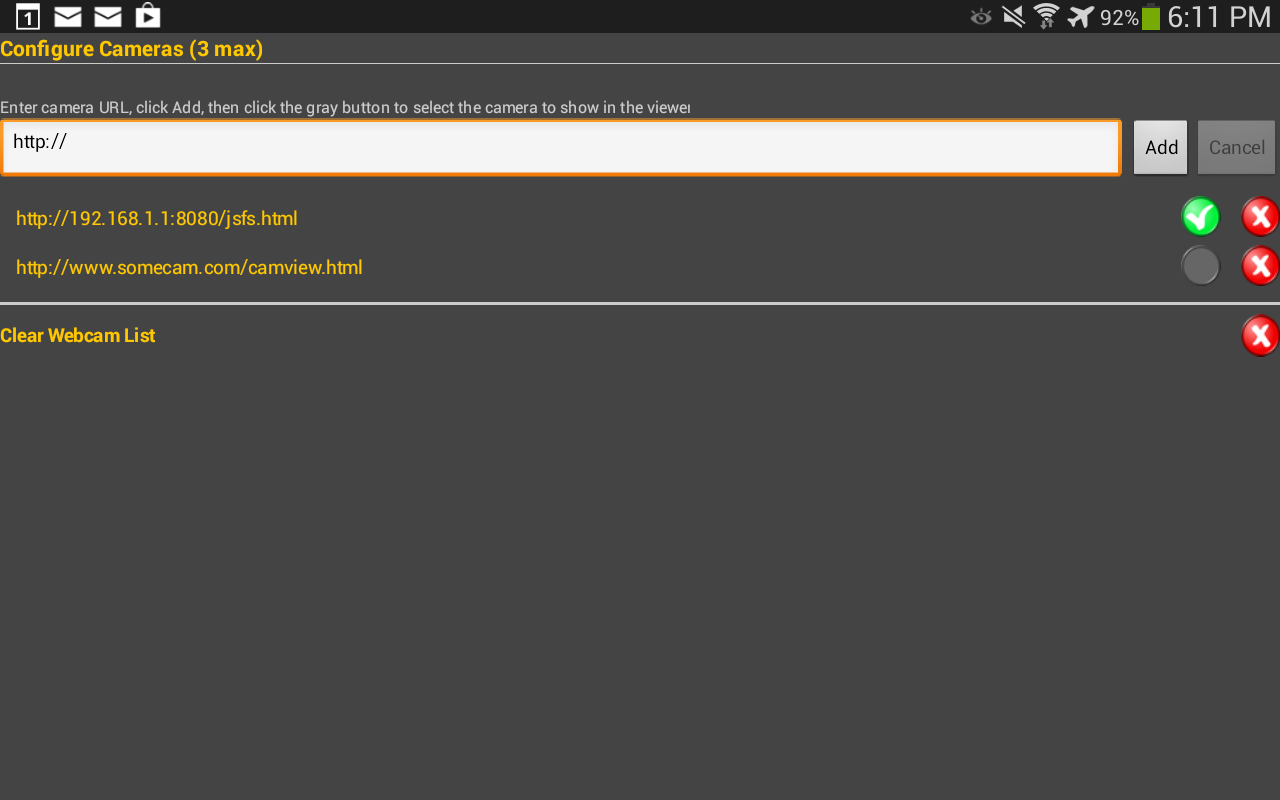
WiFi Bot Control – IP Cam Config Screen:
This app uses the same approach for viewing an IP Camera stream as BT Bot Control. Detail can be found in the instructions. Also see the FAQ section below.
Server Components & Setup
At the time of this writing, there wasn’t a library to allow the Adafruit CC3000 to act as a server and process data requests directly. Instead, I implemented a fork of this sample (thanks and credit Marc-Olivier Schwartz). The basic idea is that when using WiFi Bot Control, the app constantly sends a URL request to a PHP file on a server (or a computer with a webserver on it). The request contains updates to the x/y/command values (samples below). The PHP file is called and populates the data file. This is whole process is done rapidly from WiFi Bot Control. At the same time the robot (sketch sample below) is constantly polling the server and calling a PHP file that parses the JSON file for the data contents. It extracts the variables and uses them to drive the motors or act on commands.
You can host the server locally or remotely. It must also have PHP on it, and write permissions to the JSON file(s). On the Arduino side, the sketch points to the server IP address. On the Android side, it can be the URL or the IP address of the server. Note, if you are doing this within your own personal environment, you will have to ensure that the necessary port (usually 80) is open. Also, the PHP file needs write permission on the json file(s).
Remote Control Only Files (download at bottom):
- updatestate.php – this file is called from WiFi Bot Control to update robotstate.json with updated values from the joystick / command buttons
- robotstate.json - this file contains the actions for the robot. This file must be writable by the IUSR web account of your webserver. Example contents: {“mode”:”1″,”xval”:”0″,”yval”:”0″,”udlr”:””,”cmdVal”:””}
- server.php – this file is called from the Arduino robot and parses the json file (robotState.json for this example)
- Be sure to check out the demo from the Adafruit Learning System.
- Server files for this sample can be downloaded at the bottom of this post.
Remote Control & Read Arduino Data Files (download at bottom):
WiFi Bot Control has a feature (in Settings) to enable reading of data pushed from your Arduino device. In addition to the above files, use the below files for reading sensor data. The latest sketch (below) has a sample to show how to do this. The below files are needed on the server to receive the request from the Arduino, process the results and also allow WiFi Bot Control to request them. Details:
- arduinoPush.php – This file is called from the sketch and populates the results in the json file (below). You can add as many fields as you like here. You must also update the URL request in the sketch to match. The current sample is setup to write numeric values (i.e {“result1″:null,”result2″:3333}). To write text values, arduinoPush.php has to be modified to write value as text (i.e. {“result1″:”testA”,”result2″:”testB”})
- arduinoPushResults.json – This file contains the sensor and other readings from the Arduino device. Note – this file must be writable by the IUSR web account of your webserver. The file also read from WiFi Bot Control.
- androidPull.php – WiFi Bot Control uses this file to parse and read the json file (above) and use it to display sensor and other reading results.
To use this feature, go to Settings and select Enable Sensor / Data Polling. Then, configure if you want to use manual or timer-based polling. The value for Polling URL tells WiFi Bot Control where the androidPull.php file is. You can also configure custom titles for each data element passed. To do this, enter the titles you want to use in the Result Titles box with a comma “,” separating each. For example, if you have 2 values that you want to display, you could enter: “Temperature C =, Humidity =” (without the quotes). If you choose not to enter any values, it will simply display as “Result1= Result2= etc“.

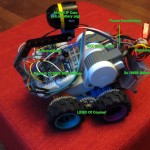
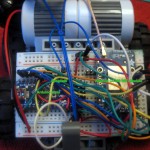
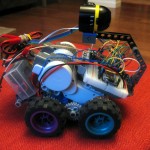
Arduino Robot – Say Hi to Eddie
What equipment is needed?
WiFi Bot Control talk to a robot that you can build. Here’s a breakdown of the main parts required:
- Arduino Nano (or other Arduino controller with sufficient Analog and Digital ports – i.e. the Uno)
- Voltage Regulator Module
- Adafuit CC3000 WiFi module, Spark Core**, or Arduino WiFi shield. (** – will need to validate this once my Spark arrives).
- Digistump Motor Shield (most any motor controller will work).
- Robot
- IP camera (optional) – Warning, after using the Ai-Ball for some time, I strongly suggest you look to other options. Frankly, this unit sucks. It’s a battery pig, and is poorly built. Also expensive for what it is. The only advantage it has is that it’s the smallest IP camera I could find.
- Motors – I used a set of these cheap servo’s from DX. If you get them, you will have to mod them to remote the position sensor tabs. An easy mod for most. There are also continuous rotation servo’s out there.
- Batteries – for the robot, I used 2x 18650 batteries wired in series to provide 7.2V to the voltage regulator. From there, I push 5V to the various Arduino components, motor shield and the CC3000. The motor shield provides the power to the servos. The Digistump unit supports up to 15V 3.x Amps combined, so you can use more powerful motors.
- I also added a small blue LED to serve as a status light. It blinks with data communications between the robot and the server. I also suggest another LED that comes on once the CC3000 has established a connection. Maybe muti-coloured to show different connection states as the unit takes some time to get connected initially.
The CC3000 and motor shield are connected to the Arduino Nano (pinouts below). The sample Arduino sketch provides a fully functioning application based on the base build. You can also add customize the sketch to your liking as well as enable features that can be used by the 8 custom command buttons.
Arduino Controller Pinouts
Connections between the various modules and the Arduino Nano are as follows. Not shown are the DC step down linear regulator.

Arduino Sketch:
The below Arduino sketch is based on the original robot used with WiFi Bot Control. It can be used as-is if you build the same controller and want the same functionality as described here. It can also be customized should you want to customize your controller and add or change features. Check it out:
** be sure to subscribe for update as the below sample code may change. See top right.
Latest Jan 2 2014: WiFi Bot Control Sketch
- If you downloaded the above sketch before Dec 10/13 and are having issues, download this one and try it. It has an Idle Timeout parameter that provides stability of your server closes it’s connection too fast.
- Simplified motor driving function – (can do with further tweaking)
- Added sample to demonstrate sending sensor and other data to WiFi Bot Control (must have the latest version of WiFi Bot Control)
Earlier Version: WiFi Bot Control Demo Sketch
Server Files:
Download these files if you are only using WiFi Bot Control as a remote: ServerFiles
Download these files if you are using WiFi Bot Control as both a remote and also reading data from your robot: ServerFilesSensorRead
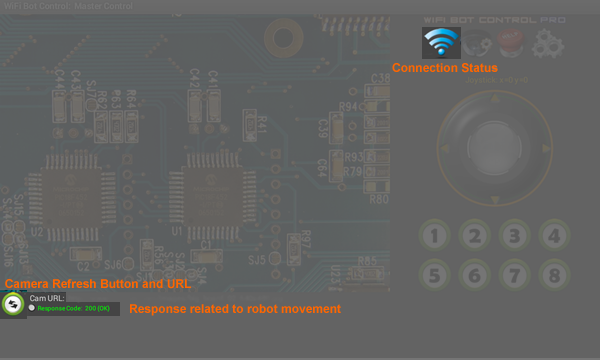
If you are having issues viewing a direct video stream from your IP camera (i.e. http://mycamera.com/videostream.cgi is not working), have a look at this site to see what varying modes your IP Camera has (be sure to search for your camera). If none of these work, you can setup a webpage to auto-refresh your camera in snapshot mode and then use the URL to the website in BT Bot Control / WiFi Bot Control. First, you must find the URL that your camera uses to view a snapshot. Steps: Camera Options: For this project, I used the Ai-Ball tiny IPCam. However, take my word for it, it’s a waste of money and a battery pig. It’s only advantage is that it’s small. If you are using the Ai-Ball or other similar webcam, the configuration is as noted below. If you have a spare phone laying around that has a camera, I suggest you get IP Webcam from Google Play. This great little app allows you to turn your mobile phone into a webcam and access its video stream. The full screen streaming Javascript seems to work best. Give it a try – use your local IP address: http://192.168.x.x:8080/jsfs.html (check IP Webcam settings). Assumptions: If you are having troubles setting up your IP Camera,the following are some approaches that may (or may not) work for your camera. Some of these are specific to certain camera manufacturers: 1) Generic interface to Foscam IP Cameras. You could build a webpage that displays the camera and then refer to the webpage URL in WiFi Bot Control / BT Bot Control. Once done, then use the URL you use to access the webpage in the apps. 2) Interface to Foscam H.264 Cameras. .. Right click this link, save to your website folder and edit the IP/PORT, user and password. Test in your browser befor adding the URL to the apps. 3) Check this site and search for your camera. It will show you various ways to get access to direct stream and snapshot modes for IP Camera.s WiFi Bot Control sends joystick and command data through a configurable URL. You configure the main part of the URL (ie. http://www.yourserver.com/folderWhereFilesReside/updateState.php?). Don’t forget the “?”, as it won’t work without it. To test this out, there is a really easy solution. Also note, that you should see the values for x and y go back to 0 if you remove your finger from the joystick. This is by design. To see actual values, keep moving the joystick while performing the above activities. WiFi Bot Control has 2 may web components: ** This page is outdated. Update coming. There’s the IP Camera Viewer that you see on the main screen to the left, and then there’s a Web Component that is a background service that processes the joystick and command buttons. The Web Component is not visible and has nothing to do with the IP Camera Ciewer, so don’t get them confused – they are completely separate. IP Cam Viewer – Use the Settings to setup a pointer to your IP Camera. Once this is done, you should see the video stream in the viewer. The Cam URL button (shown bottom left in picture below) simply refreshes the Camera URL. The Web Component sends commands to the robot. This value is set in the Settings, and the rest of it is constructed to make a complete URL (see above for samples). When moving the joystick or sending commands, the values are parsed into the URL string and a background call is made to the Web Component. You can view real-time update of this by going into Settings and checking the option (“Debug….”) to view the URL as its being created and sent. It will appear at the top. If there is a problem with the URL, the Response Code value (shown at the bottom – pic below) will update with an error code (usually 1101). Clicking the [view] link will pop up a message showing you the last URL that was sent. Note – you should expect to see 0′s in X and Y values as the joystick always moves back to zero. If you are experiencing errors and you have verified that your devices is connected, check your URL carefully. You may even want to re-create the same URL on your PC browser to test it to ensure it is correct. It’s most likely that something is wrong with the core URL part you set in Settings. The Connection Status button at the top (pic below) is simply to test your Internet connection. It tries to connect to www.google.com. If it fails, there will be an error in the Response Code section at the bottom that you can view. If this is failing, its most likely your WiFi connection is down. Also note that clicking this button will not load www.google.com into the IP Cam viewer as this is configured to point to the URL you defined for your IP Camera. It a completely separate component. Note, if it fails the first time, give it a few more tries as sometimes it has a brain fart.WiFi Bot Control - FAQ
Configure IP Camera for Viewing
<!DOCTYPE html PUBLIC "-//W3C//DTD XHTML 1.1//EN"
"http://www.w3.org/TR/xhtml11/DTD/xhtml11.dtd">
<html xmlns="http://www.w3.org/1999/xhtml" xml:lang="en">
<head>
<title>IPCam Snapshot Viewer</title>
<meta http-equiv="content-type" content="text/html; charset=iso-8859-1" />
<link rel="stylesheet" href="styleAiBall.css" type="text/css" />
<!--[if IE 6]>
<link rel="stylesheet" href="fix.css" type="text/css" />
<![endif]-->
<script language="javascript" type="text/javascript" src="/functions.js"></script>
<script type="text/javascript">
var imageNr = 0; // Serial number of current image
var finished = new Array(); // References to img objects which have finished downloading
var paused = false;
var previous_time = new Date();
var previousIndexImg = 0;
function createImageLayer() {
var img = new Image();
img.style.position = "absolute";
img.style.zIndex = -1;
img.onload = imageOnload;
img.onclick = imageOnclick;
//img.width = 512;
//img.height = 384;
img.width = 640;
img.height = 480;
img.src = "http:// 192.168.1.105:99/snapshot.cgi&n=" + (++imageNr); //note, be sure to leave the &n= and the rest at the end of your URL. ONLY CHANGE THE HIGHLIGHTED PART!
var webcam = document.getElementById("webcam");
webcam.insertBefore(img, webcam.firstChild);
}
// Two layers are always present (except at the very beginning), to avoid flicker
function imageOnload() {
this.style.zIndex = imageNr; // Image finished, bring to front!
while (1 < finished.length) {
var del = finished.shift(); // Delete old image(s) from document
del.parentNode.removeChild(del);
}
finished.push(this);
current_time = new Date();
delta = current_time.getTime() - previous_time.getTime();
fps = (1000.0 / delta).toFixed(3);
previous_time = current_time;
if (!paused) createImageLayer();
}
function imageOnclick() { // Clicking on the image will pause the stream
paused = !paused;
if (!paused) createImageLayer();
}
</script>
</head>
<body onload="createImageLayer();showValue();">
<table width="100%" border="0" cellspacing="0" cellpadding="0">
<tr>
<td> </td>
<td width="640" height="480" valign="top" > <div id="wraper">
<div id="content">
<div id="webcam" style="width:640px;height:480px"><noscript><img src="http://192.168.1.105:99/snapshot.cgi" width="640px" height="480px" /></noscript>
</div>
<br />
</td>
<td> </td>
</tr>
</table>
</body>
</html>
<script type="text/javascript">
//~~~~~~~~~~~~~~~~~~~~~~~~~~~~~~~~~~~~~~~~~~~~~~~~~~~~~~~~~~~~~~~~~~~~~~~~~~~~~~~~~~~~~~~~~~~~~~~~~~~~~~~~~~~~~~~~~~~~~~~~~~~~~~~~~~~~~~~~
//Reload Video Interval
function reload()
{
setTimeout('reloadImg("refresh")',100)
}; function reloadImg(id)
{
var obj = document.getElementById(id); var date = new Date();
obj.src = "http://192.168.1.105:99/snapshot.cgi";
}
//~~~~~~~~~~~~~~~~~~~~~~~~~~~~~~~~~~~~~~~~~~~~~~~~~~~~~~~~~~~~~~~~~~~~~~~~~~~~~~~~~~~~~~~~~~~~~~~~~~~~~~~~~~~~~~~~~~~~~~~~~~~~~~~~~~~~~~~~
</script>
</HTML>Adding IP Camera URLs
Configure IP Camera – Alternate Approaches
How to tell if WiFi Bot Control is sending data correctly?
Understanding the Refresh and Connection Status Buttons